
CI/CD
지속적인 통합과 지속적인 배포인데
우리는 지속적인 배포를 해봅시다. 무중단 배포 아닙니다.
저번에 .txt파일을 옮겨 보았다 따라서 이번에는 react 를 자동 install , build , nginx 시작까지 해볼생각이다.
Overview
이번에는 Github Actions 를 사용해서 AWS EC2 에 자동으로 배포하는 과정을 알아봅니다.
글은 다음과 같은 순서로 진행됩니다.
- 폴더 구조
- appspec.yml 파일 작성
- workflow (git actions) 파일 작성
- start.sh , stop.sh 파일 작성
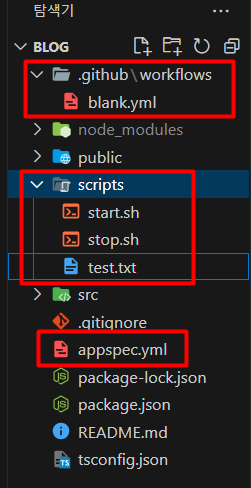
1. 폴더 전체 구조
보시다 시피 별로 달라진 점은 없다.
2.appspec.yml
이번에는 appspec.yml 을 작성해볼 것이다 이전과 마찬가지로 조금만 수정해주면 된다.
그저 바뀐 점이라고는 build 파일을 바라보라 밖에 없다. 또한 나는 nginx 가 /home/ubuntu/nginx/build 폴더의 index.html을 바라보게 설정이 되어있다. 밑 링크는 nginx 설치법
https://tinylittlelife.tistory.com/294
version: 0.0
os: linux

files:
  - source: ./build  # 로컬 폴더 build 파일있는곳 지정
    destination: /home/ubuntu/nginx/build # 위의 파일을 둘 장소
    overwrite: yes

permissions:
  - object: /home/ubuntu/nginx/build/ # 파일 둔 장소 권한 해체
    pattern: "**"
    owner: ubuntu
    group: ubuntu

hooks:
  BeforeInstall:
    - location: scripts/stop.sh
      timeout: 60
      runas: ubuntu
  ApplicationStart:
    - location: scripts/start.sh
      timeout: 60
      runas: ubuntu
3. workflow 작성
이번에는 workflow! 한마디로 git에서 s3로 가기전 처리과정 , s3 배포 , aws 배포를 등을 담당하죠 한번 보죠
name: Deploy to Amazon EC2

on:
  push:
    branches:
      - main

# 리전, 버킷 이름, CodeDeploy 앱 이름, CodeDeploy 배포 그룹 이름
env:
  AWS_REGION: ap-northeast-2
  S3_BUCKET_NAME: my-github-actions-s2-bucket
  CODE_DEPLOY_APPLICATION_NAME: my-codedeploy-app
  CODE_DEPLOY_DEPLOYMENT_GROUP_NAME: my-codedeploy-deployment-group

permissions:
  contents: read

jobs:
  deploy:
    name: Deploy
    runs-on: ubuntu-latest
    environment: production

    steps:
    # (1) 기본 체크아웃
    - name: Checkout
      uses: actions/checkout@v3

    - name: Setup Node.js
      uses: actions/setup-node@v4
      with:
         node-version: '18'  # 사용할 Node.js 버전을 지정

    - name: Check Node v            # Node v 확인
      run: node -v

    #- name: go to src
    #  run: cd src

    - name: Install dependencies    # 의존 파일 설치
      run: npm install

    - name: Generate build
      run: CI='false' npm run build

    # (4) AWS 인증 (IAM 사용자 Access Key, Secret Key 활용)
    - name: Configure AWS credentials
      uses: aws-actions/configure-aws-credentials@v1
      with:
        aws-access-key-id: ${{ secrets.AWS_ACCESS_KEY_ID }}
        aws-secret-access-key: ${{ secrets.AWS_SECRET_ACCESS_KEY }}
        aws-region: ${{ env.AWS_REGION }}

    # (5) 빌드 결과물을 S3 버킷에 업로드
    - name: Upload to AWS S3
      run: |
        aws deploy push \
          --application-name ${{ env.CODE_DEPLOY_APPLICATION_NAME }} \
          --ignore-hidden-files \
          --s3-location s3://$S3_BUCKET_NAME/$GITHUB_SHA.zip \
          --source .

    # (6) S3 버킷에 있는 파일을 대상으로 CodeDeploy 실행
    - name: Deploy to AWS EC2 from S3
      run: |
        aws deploy create-deployment \
          --application-name ${{ env.CODE_DEPLOY_APPLICATION_NAME }} \
          --deployment-config-name CodeDeployDefault.AllAtOnce \
          --deployment-group-name ${{ env.CODE_DEPLOY_DEPLOYMENT_GROUP_NAME }} \
--s3-location bucket=$S3_BUCKET_NAME,key=$GITHUB_SHA.zip,bundleType=zip3.1. workflow 작성 무엇이 달라졌는가?
aws 인증 , s3 와 aws 배포 모두 이전과 같은 설정이다.
다만 s3 배포전 체크아웃 , node.js 설치 , install , build 와 같은 과정을 거친후에 배포가 되도록 설정되어있다
3.2. workflow 작성 주의점?
1. node.js
일단 기본적인 세팅은 비슷할거다 다만, 이곳에서 node.js 버젼을 바꿀 수 있으니 원하는 버젼으로 바꿔주자
    - name: Setup Node.js
      uses: actions/setup-node@v4
      with:
         node-version: '18'  # 사용할 Node.js 버전을 지정
2. build 과정에서의 fail
배포를 하다가 build 과정에서 Treating warnings as errors because process.env.CI = true.
Most CI servers set it automatically. 문자가 보일 수 있다
이를 해결하는 방법은
단순히 npm run build 가 아닌 CI="false" npm run build를 해주어야 한다.
    - name: Generate build
      run: CI='false' npm run build
4. start.sh 와 stop.sh 작성
위의 3번까지 되었다면 이제는 자유로이 설정이 가능하다!!
start.sh 와 stop.sh 는 간단하게 만들어 보기만 했지만 다른 분들은 막 어려운 복잡한 뭔가를 하던데 난 못하겠다 ㅋㅋㅋㅋ
간단히 봐보자
stop.sh
#!/bin/bash

# 이 스크립트는 애플리케이션을 중지하는 데 사용됩니다.
# 필요한 중지 작업을 여기에 추가하세요.
# exec > >(tee /var/log/codedeploy_stop.log|logger -t codedeploy_stop -s 2>/dev/console) 2>&1
echo "애플리케이션을 중지합니다."
# 여기에 애플리케이션 중지 명령어 또는 작업을 추가하세요.
sudo systemctl stop nginx
# build 파일 삭제
sudo rm -rf /home/ubuntu/nginx/build
# nginx 들어가기
cd /home/ubuntu/nginx
# build 배포 폴더 만들기
mkdir build
start.sh
#!/bin/bash

# 이 스크립트는 애플리케이션을 시작하는 데 사용됩니다.
# 필요한 시작 작업을 여기에 추가하세요.
# exec > >(tee /var/log/codedeploy_start.log|logger -t codedeploy_start -s 2>/dev/console) 2>&1
echo "애플리케이션을 시작합니다."
# 여기에 애플리케이션 시작 명령어 또는 작업을 추가하세요.
sudo systemctl start nginx
네 별거 없어요 ㅋㅋㅋ
5. 이 과정에서의 에러들
1. build fail
빌드 실패 에러
해결 : npm run build -> CI="false" npm run build
2. s3 에러 - The deployment failed because a specified file already exists at this location: /home/ubuntu/nginx/build/static/css/main.bed34cb6.css
해결 : 몰루 그냥 존재한데요 ㅋㅋ 걍 없애고 새로 깔았음
'Git' 카테고리의 다른 글
| Git Book - Git을 배울 수 있는 사이트 (0) | 2024.02.01 |
|---|---|
| Git - Git Alias (0) | 2024.02.01 |
| git actions - build.gradle 시 주의점 (1) | 2023.12.29 |
| aws , git actions - Springboot war 파일 옮겨보기 (1) | 2023.12.29 |
| aws EC2 , S3 , codedeploy , git actions - 간단하게 txt파일만 옮겨보기 (1) | 2023.12.27 |