
Server to Server
💡 1. RestTemplate 사용 이유

RestTemplate은 Spring Framework에서 제공하는 HTTP 통신을 간편하게 처리할 수 있는 클래스입니다.
org.springframework.web.client.RestTemplate 패키지에 존재 합니다.
RESTful 웹 서비스와의 통신을 위해 주로 사용되고 기본적으로 동기 방식으로 처리되며,
비동기 방식으로 처리하고 싶을 경우 AsyncRestTemplate를 사용하면 됩니다.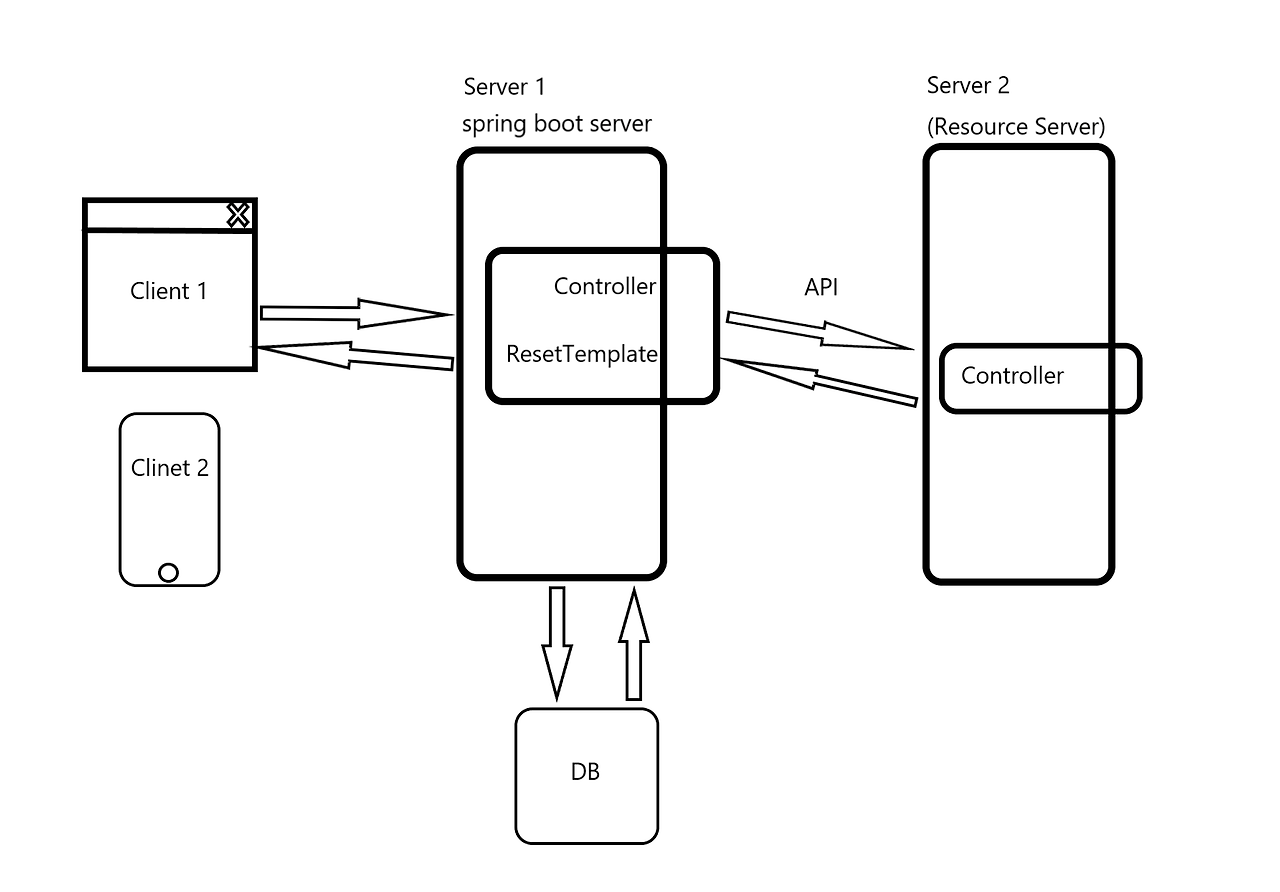
RestTemplate 대표적인 메서드
|
RestTemplate Method
|
HTTP Method
|
설명
|
|
getForEntity
|
GET
|
get 요청을 보내고 ResponseEntity로 응답을 받음
|
|
getForObject
|
GET
|
get 요청을 보내고 java object로 매핑받아서 반환받음
|
|
exchange
|
Any
|
헤더 세팅해서 HTTP Method로 요청보내고 ResponseEntity로 반환받음
|
|
put
|
PUT
|
PUT 형식으로 요청
|
|
delete
|
DELETE
|
DELETE 형식으로 요청
|
|
postForLocation
|
POST
|
post 요청을 보내고 java.net.URI 로 반환받음
|
|
postForObject
|
POST
|
post 요청을 보내고 Object로 반환받음
|
|
postForEntity
|
POST
|
POST 방식으로 요청하면 ResponseEntity를 반환해 준다.
|
|
optionsForAllow
|
OPTIONS
|
해당 URI에서 지원하는 HTTP 메서드를 조회
|
|
execute
|
Any
|
요청과 응답에 대한 콜백 수정
|
예시문
package com.tenco.bank.controller;

import java.net.URI;

import org.springframework.http.HttpEntity;
import org.springframework.http.HttpHeaders;
import org.springframework.http.HttpMethod;
import org.springframework.http.HttpStatus;
import org.springframework.http.ResponseEntity;
import org.springframework.util.LinkedMultiValueMap;
import org.springframework.util.MultiValueMap;
import org.springframework.web.bind.annotation.GetMapping;
import org.springframework.web.bind.annotation.RestController;
import org.springframework.web.client.RestTemplate;
import org.springframework.web.util.UriComponentsBuilder;

@RestController // DATA 를 내려줌
public class RestControllerTest {

	// 클라이언트에서 접근하는 주소 설계
	@GetMapping("/my-test1")
	public ResponseEntity<String> myTest1() {
		// 여기서 다른 서버로 자원을 요청한 다음
//		다시 클라이언트에게 자원을 내려주자

		// 먼저 URI 객체 만들기
		URI uri = UriComponentsBuilder.fromUriString("https://jsonplaceholder.typicode.com").path("/todos").encode()
				.build().toUri();

		// HTTP 통신 --> HTTP 메세지 헤더, 바디를 구성해서 보내야한다.
		RestTemplate restTemplate = new RestTemplate();

		// 헤더 구성
		HttpHeaders headers = new HttpHeaders();
		headers.add("Content-type", "application/json; charset=UTF-8");

//		바디 구성
		MultiValueMap<String, String> params = new LinkedMultiValueMap<>();
		params.add("title", "블로그 포스트 1");
		params.add("body", "후미진 어느 언덕에서 도시락 소풍");
		params.add("userId", "1");

//		헤더와 바디 결합
		HttpEntity<MultiValueMap<String, String>> requestMessage = new HttpEntity<>(params, headers);

//		HTTP 요청처리 , 자동으로 class 파싱이 됩니다.
		ResponseEntity<String> response = restTemplate.exchange(uri, HttpMethod.POST, requestMessage, String.class);

		System.out.println("headers : " + response.getHeaders());

		return ResponseEntity.status(HttpStatus.OK).body(response.getBody());
	}


}
'SpringBoot' 카테고리의 다른 글
| Springboot - OAuth 2.0(Open Authorization) 인증 방식의 이해 (1) | 2024.02.06 |
|---|---|
| Springboot - Gmail의 STMP서버활용 이메일 전송 (0) | 2024.02.06 |
| Springboot - HandlerInterceptor (1) | 2024.02.02 |
| Springboot - @RequestBody 와 @ModelAttribute 의 차이점 (0) | 2024.01.30 |
| URI 설계 - GET , POST, PUT , DELETE 와 Path Variable vs Query Parameter (0) | 2024.01.30 |